Sunday 30 October 2011

3D Archery Tips, Tuning and Archery Product Field Reviews.

I started this 3D Archery site to show Archers a how to approach on bow tuning, product field reviews I have conducted on various archery products. 

This site is dedicated to provide Archery Tips, Bow Tuning and Product Field Reviews in its entirety, complete with how to do it yourself photos.

You will also notice this is not one of those every time a visitor visits my site I get paid for advertising deal.

There is no advertising on my site, this site is developed to advance the sport of archery and nothing more.

While there are dozens of Archery Forums out there I subscribe to and visit daily, members of these archery forums pose questions that remain unanswered, sometimes for months or are answered incorrectly. This one thing I look for, that is answering a question posed by archers,complete with photos and detailed descriptions of a product they want to know before purchasing.

Many archery forums do not allow server space to allow enough photographs to include in their forums.  This is especially important for those Archers, before outlaying cash for a archery product who would at least like see a field review of an archery product out of it's package first and/or look for tuning tips.

Some archery forums feel this may be a plug for a particular archery manufacturer or feel it could be construed as spam. Nope,no spam here!! Bottom line is I buy the archery equipment out of my own pocket or borrow archery equipment from a fellow archer, or a archery manufacturer sends me a product to try out.

It surprising many archery manufacturers who do not have Field Test staff who actually go out day in and day out and shoot the archery products they manufacturer. Of course many Archery Manufacturers may use a Staff Professional Archer, one who may state glowing reviews and rarely provide in depth photos of the guy actually shooting it.

I, like the 99% of you am an average archer, with average medium priced archery equipment.


To view my latest field review or bow tuning tips, please go to the right hand column to the right and click the review you are interested in.

I enjoy trying out archery products and writing about it, plain and simple.

Money is tight for many of us and its nice to see someone like me try it first before you outlay cash for it.

Ask yourself this? How many of us have 2 or 3 trigger releases, arrow rests, arrows, broadheads, gizmos, peep sights, Cams and other Doo Dads lying in our drawer, purchased because we thought they were the latest and greatest, only to find out they didn't live up to the Archery Manufacturers claims? This is why I am doing what I do! To dispel or praise a archery product that will be purchase worthy.

Ultimately the final decision is up to you whether my review fits your need to buy it. I would like to believe all archery manufacturers make good equipment, though based on how much we want to pay for it, as there is lower and medium end archery equipment most can afford and the pricey top of the line equipment.

While this archery site is based on my field tests, they are conducted using my own equipment which I explain in my profile,I also have fellow archers of varying skills from novice to intermediate to semi pro who also conduct field tests with me as well to ensure the tests are unbiased and photographing the results to show results.

Though your archery equipment set up may vary and results may be different, it should provide similar results in most instances. 

Visitors to this site, please feel free to offer your comments or suggestions of other products in our quest to advance the sport of archery.

Any question I cannot answer, I will provide a link either to an archery forum or archery manufacturer to provide your answer.

By the way if there is an archery product you would like to see reviewed, send me the info and I will either purchase it or see if any of our 500 members of the Burnaby Archers or surrounding Archery clubs in the lower mainland have the product I could borrow from them.

Thanks for visiting

Barry O'Regan

Saturday 1 October 2011

Bohning Killer 4" Vanes Review

Barry O'Regan- Bohning Pro Field Staff, Staff Shooter - T.R.U. Ball Staff Shooter.

I have conducted a test of Bohning’s 4 inch Killer Vanes.

The weather conditions to say the least were less than ideal, a mild easterly wind, cloud and some drizzle and mud!

The Setup

To ensure straightness and durability I purchased 6 broad heads, 6 field points, and 3 Easton Aluminum 2314 arrows and 3 X-Weave 200 arrows.

I then cut the arrows down to ensure they would all weigh the same, approx 300 grains. All six broad heads weighed in at 125 grains each, all field points weighed in at 100 grains each.

I fletched the Bohning Killer 4 inch vanes using the Bohning Helix Tower putting a 2 degree twist on the Bohning Killer Vanes on three aluminum shafts (Easton 2314s) and three PSE Carbon X-weaves 200s.

I then placed silver duct wrap on the carbon arrows so readers would be able to differentiate between the black X-Weave carbon arrow groups and the black Easton aluminum groups.

Both Bohning Killer Vane aluminum and carbon arrows came in at approx: 400 grains with 100 grain field points.

Both Killer Vane equipped aluminum and carbon arrows came in at 425 grains with 125 grain.

I will be shooting both sets of arrows (Generic Broadhead Tipped and Field Point Tipped) at 40 yards.


I also decided to shoot Bohning Blazer vanes on my Hot Pink Victory 400 arrows which also came in at 400 grains with 100 grain field points. I wanted to see how my Bohning Blazer equipped Victory arrows would stack up in grouping and accuracy against the Bohning Killer Vane arrows.

For my test I used a typical compound hunting bow, my 2008 Hoyt ProElite Compound Bow measure out at 29 inch draw length with a 58 # draw weight.

                                                                                                                                  
                                                 Generic solid broadhead
Top arrow Easton Aluminum. Lower arrow Carbon X weave with silver foil on the shaft.

Test Results with Field Points

My tests with field point in the accompanying photos show the following:

• Bohning Killer Vanes on both Easton Aluminum 2314 arrows and Bohning Killer Vane Carbon X-weaves 200 equipped with 100 grain field points.

• Photos show both Bohning Killer Vane aluminum and carbon shafts shot at 40 yards with my 40 yard sight pin into our target butts shown in the first photo on the far right

Results: I got great groups and awesome accuracy.


Test Results shooting Bohning Blazers against the Bohning Killer Vane

After removing the broad heads, I then fitted both the Bohning Killer Vane Easton aluminum and X Weave carbon arrows with 100 grain field points.

I then shot the Bohning Killer Vane equipped Aluminum and Carbon arrows at 40 yards, and then shot the Bohning Blazer Vane Victory arrows using my 40 yard sight pin.

I was curious to see how all three types of arrows with two different style of Bohning Vanes would group.

Results
• Extremely tight groups. Interesting observation though, I fired 3 different sets of 3 arrows and got three separate groups. The Bohning Killer Vane Easton aluminum arrows grouped together.

The Bohning Killer Vane equipped X Weave arrows grouped together and finally the Bohning Blazer Vane Victory Arrows grouped nice and tight as well.
Test Results with Bohning Killer Vanes and Broad heads

Photos show Bohning Killer Vane arrow, both aluminum and carbon shafts outfitted with 125 Grain Broadheads and fired at 40 yards, using my 40 yard sight pin.


The Result

• The broad head equipped carbon arrows with Bohning Killer Vanes grouped low, but grouped together and the broad head equipped Bohning Killer Vane aluminum arrows grouped slightly higher but grouped together. (as you can see in photos below)

• All in all I received great groupings, though both the broad head equipped aluminum and carbon arrows were 25 grains heavier, both sets of 3 arrows each showed a little right and low a couple of inches from the bulls eye! The groups were great in both sets of 3 arrows.

• A minor sight adjustment would put them in the centre of the bulls-eye.

Novice Shooters give a turn with Bohning Killer and Blazer Vanes

There were two novice Bowhunters, who shoot bare bow compound (Kyle and Kristen) at the range; both have only been shooting for a month or so.

I thought to myself, I wondered how Kyle would fare shooting both the Bohning Killer vane aluminum and carbon arrows with field points.

I gave the Bohning Killer Vane Easton Aluminum and X-Weave Carbon arrows to Kyle to shoot at 30 yards.

Results

The photos were surprising, as their current arrows do not even come close to grouping as tight as the Killer Vane arrows. Though to be fair their lower premium arrows did not seem matched to their bows.

Kyle's Results

What is just as interesting is again, the (silver tape wrapped) Carbons grouped together and the Easton Aluminum arrows grouped together.


Both sets of identically spined and evenly weighted arrows fitted with Bohning Killer Vanes would just not mix it up preferring to group Easton aluminum arrows to Easton aluminum arrows and X-Weave carbon arrows with X-Weave carbon arrow grouping.

Bottom line seems to indicate Aluminum arrows group higher with little drop when fitted with field points or broadheads with outfitted with the Bohning 4 inch killer Vanes.

Kristen's Results

I took my Bohning Blazer equipped Pink Victory arrows and photographed Kristen shooting them at 30 yards.   The Killer Vane equipped arrows were a tad heavy at 400 grains for her 30 # draw weight on her bow.  So I elected to let Kristen to try out the Bohning Blazers with a 3 degree helical and see how they would perform.


Certainly the end result with there two novice Bowhunters whose skill is currently limited at 30 yards and with only a month of practice says it all, with the smile on Kristen's face.

Conclusion

In the hands of an experienced archer, with a quick sight adjustment, your Bohning Killer Vanes, whether on aluminum arrows or carbon arrows.

You can feel confident that even when equipped with broadheads your Bohning Killer Vanes will fly true and hit their mark consistently to give you outstanding groups.

Bohning Killer Vanes on aluminum or carbon arrows perform just as well when equipped with field points will ensure great flight, accuracy and tight groups.

In the hands of novice archers, like Kyle and Kristen, Bohning Killer Vanes or Blazers will steer your arrow more accurately ensuring its hits the target face.

Kristen's Face says it all, Bohning products "Improving a Bowhunter’s face value one shot at a time".

Bohning Offers a New Twist for Bohning Vanes using the Bohning Helix Tower Jig.


By Barry O’Regan – Bohning Pro Field Staff, T.R.U. Ball Staff Shooter.

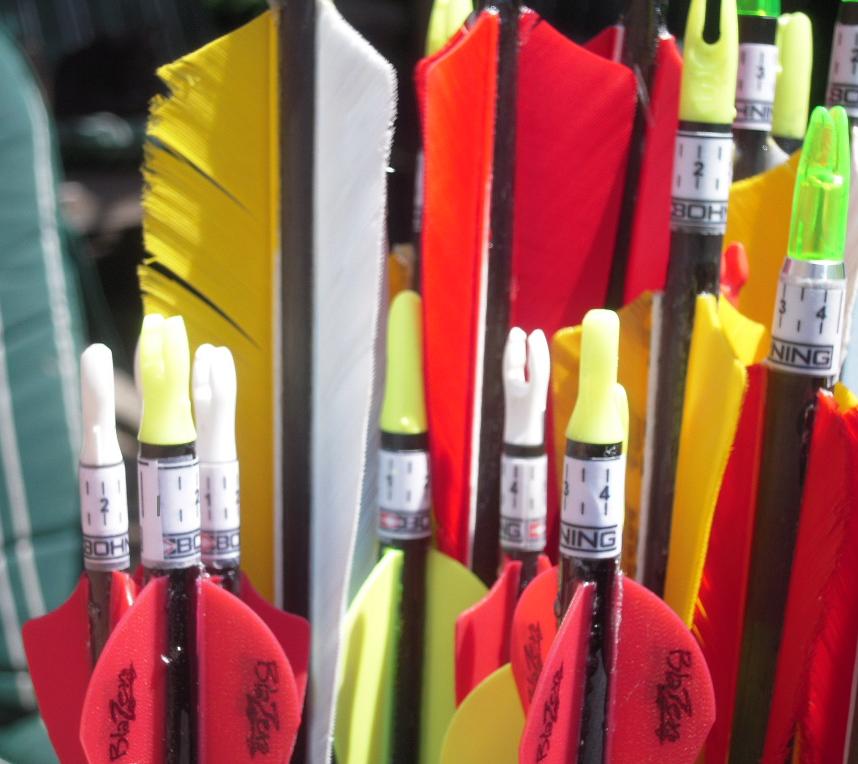
Impressive is all I can say with the 3 degree angle look and performance of the Bohning Vanes fletched using the Bohning Helix Tower Jig.


Bohning Helix Tower Jig

As the photos attest, a helical spin looks sweet with the benefit that you will soon find amazing stability and grouping when you put a helical spin on your arrows.

If physics has taught us anything when it comes to the average bow speeds today, a helical spin on an arrow offers more stability and self correcting properties in flight at various distances over a straight vane. This is especially important for Bowhunters using broadheads, FITA and 3D Shooters looking for that added edge in tournaments.

I own an assortment of Jigs, Bitz, Arizona E-Z fletch (both models) as well as both Jo-Jo Jan straight and helical jigs.

While all these are well made jigs, they do not allow for human error, when it comes to consistency from vane to vane when trying to put a helical twist on your arrows. I need a consistent vane to vane helical or straight vane profile from arrow to arrow. Bohning's Helix Tower Jig does just that!

Perfectly fletched arrows using the Bohning Helix Tower Jig

You would be hard pressed to get your Vanes on your large or small diameter carbon arrows with a perfect degree of offset on similar fletching jigs without trial and error and more effort.

Getting a perfectly aligned helical on small diameter shafts are now possible with Bohning!  

The Bohning Helix Tower Jig, provides the archer with varying shaft diameter posts for pretty much every arrow available. Now can you say the competitor's fletching jig offers you the same versatility? Bohning Does! 

The photo above shows a head on profile of Helical Bohning Blazer on a Victory HV 400 shaft.

The photo below shows the same arrow with a perfect side profile of a helical Blazer Vane.


The two photos above show a perfect 3 degree helical 1.75 Bohning X vane on a ultra skinny diameter Victory VAP!

A comparison with the Arizona E-Z fletch.

The Arizona E-Z fletch like the Bohning Helix Tower share similar qualities such as three articulated arms to install your three vanes at once and a top locking cap. The Arizona E-Z Fletch requires you to insert a nocked arrow into the receiver in order to align the shaft.  With the slotted the grooves Vanes are easy to insert, feathers on the other hand can be a tight squeeze and sometimes squish or distort the feathers.

While with the Arizona E-Z fletching unit swings the arms up the shaft, you first have to pull and twist the bottom of the tower to lock the three arms in place, then put the cap on the top of the three arms to secure the three arms from shifting.
At times when using the lock and twist method, it is sometimes not as easy as it appears and trial and error gets the best results.


A comparison with the Jo-Jo Jan multifletcher.
The Jo-Jo Jan multi fletching units will only fletch one feather at a time, but you can fletch 6 single feathers to each arrow at once. The Jo-Jo Jan is comprised of a rotating nock receiver for your nock to fit into.

The Jo-Jo Jan requires you be adept at aligning the top and bottom arrow holders, with screwdriver in hand, to get your feathers centred or offset perfectly onto the shaft.

I use the Jo-Jo Jan mostly for my 5 inch Gateway or Trueflight Feathers, which seems better suited in this case over other fletching units.


Note: All these jigs with the exception of the Arizona E-Z fletch will only do one vane at a time.

What I need is a foolproof, idiot proof jig that when I put in a vane it comes out perfect and is consistent from vane to vane, arrow to arrow, with no fussing about aligning the star constellation and earth axis. Bohning did just that with their Bohning Helix Tower Jig which puts a perfect helical on all three vanes at the same time and alignment is perfect from arrow to arrow.


Below is the A to Z (actually A to O) on the how to apply a helical fletch on your arrows. This tutorial will assist archers on how to apply a perfect and consistent helical spin on their vanes or feathers using the Bohning Helix Tower Jig.

Now to begin the fletching process

First remove your nock from your arrow, then give your un-fletched arrow a quick wipe with a clean cotton cloth dipped in a tiny amount of Bohning Archery SSR Arrow Shaft Cleaner to remove any residue and contaminants.

Then place your un-nocked arrow shaft over the centre post in Bohning Helix Jig.


Note the arrows logo, make sure you align your cock fletch with the arrows logo, this is a very important step. Failure to do so may mean poor arrow grouping at longer distances.
 

My testing of various arrow manufacturers has shown most place their logo on or near the stiffest part of the carbon arrows spine.

PSE X-Weave have no parting line and are an interweave construction around the arrow, thus their arrows are reputed to be at an optimum spine no matter where you position your nock.

What we want to achieve is arrow spine consistency from arrow to arrow, so if you align the cock fletch with the manufacturer logo it is reported your arrows should be all spined consistently, though the label may not be the stiffest part of the spine, just a consistent spine. You can field practice later on, adjusting your nock accordingly to determine the tightest arrow groups.

A consistent spine means consistent arrow groups.

Once consistent spine alignment for your arrow is assured. In my case the arrow logo was the correct spine alignment for me, take your Bohning Fletch-Tite Platinum glue and apply it along the Bohning vane grooves.

                                     Insert your vanes into the slots in the arms

                 Overview of the 3 degree slots in the Bohning Helix Jig 3 articulated arms.

                                 Apply your Bohning Platinum Glue to your vanes,


As  you fold up the fletching arms carefully; note the position of freshly glued cock vane, ensuring it is aligned perfectly to the arrow logo and press the fletching arms upwards and lightly against the arrow shaft.

Then take the red locking collar and slip it over the top of the arrow shaft and using light to moderate pressure as you slide the locking collar down towards the Bohning Helix Tower jig. Do not use too much pressure pushing down the collar to seat as it will distort the vane against the arrow shaft.

Wait 5 minutes, and lift off the Red locking collar completely, then pull away the fletching arms one by one slowly away from the arrow.

Pull out your arrow, check for the vane consistency, then put back your arrow’s nock, place the arrow nock right side up and let cure and dry for 4 hours or overnight before using.  Cleaning excess glue off the fletching arms can be easily removed quickly with your fingernail or blunt popsicle stick.  Try doing that with other jigs, good luck!


You now have a perfect 3 degree helical fletched Bohning Blazer Vane, perfection is also achieved even on a skinny Victory Nano (now called VAP) arrow with no vane overhang off the arrow.

Please Note

Using the Bohning Helix Tower jig will offer the same helical results from any vane up to 2.5 inches in length and will work with any make of arrow you choose.

If you use vanes longer than 2.5 inches in length, you will need the model called the Bohning Complete Tower Fletching jig, which comes with various fletching arms to accommodate each different vane length.

To be certain, with Bohning’s variety of fletching arm configurations the archer will not be disappointed with the results!

Field Test

I took my newly helical vane arrows to the range to compare grouping and accuracy against my straight vane Bohning Blazers and X-Vanes.

From 10 yards to 50 yards, both helical and straight vane arrows grouped almost identical, with the helical vane arrow getting a little tighter grouping.

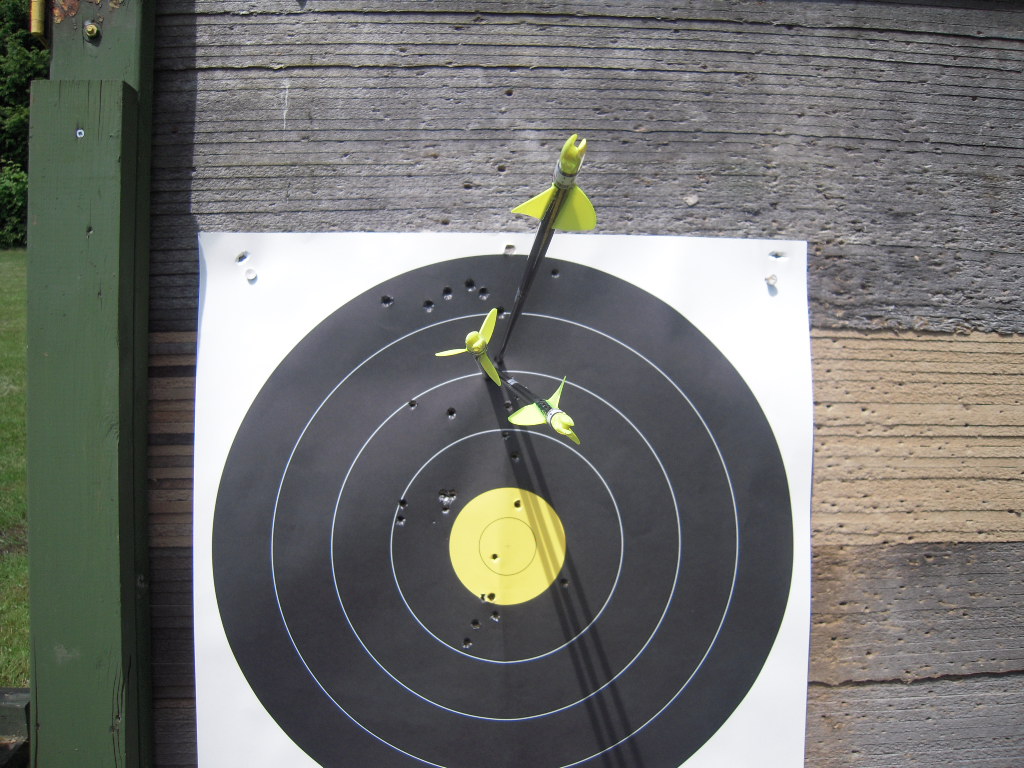
I then went out to 50-55 yards (most likely the longest distance you will shoot in a 3D shoot or hunting scenario) and shot my straight vane Bohning Green vane equipped arrows, picking two random spots on the target face. This was followed by shooting my helical Bohning Red vane equipped arrows and aiming at where I placed my two previous straight vane arrows. The result was no arrow drop with the helical vanes and bang on the money slapping against my straight Blazer vane arrows.

Arrow drop with a helical vane arrows is minimal over 55 yards, with a noticeable arrow drop at distances over 55 yards when compared to straight vane arrows. Since a helical vane on an arrow may drop a tad at longer distances, I found it does offer more stability and arrow correction at any distance. All that is needed is a small sight adjustment to bring your helical vane arrows back in line at distances over 55 yards.

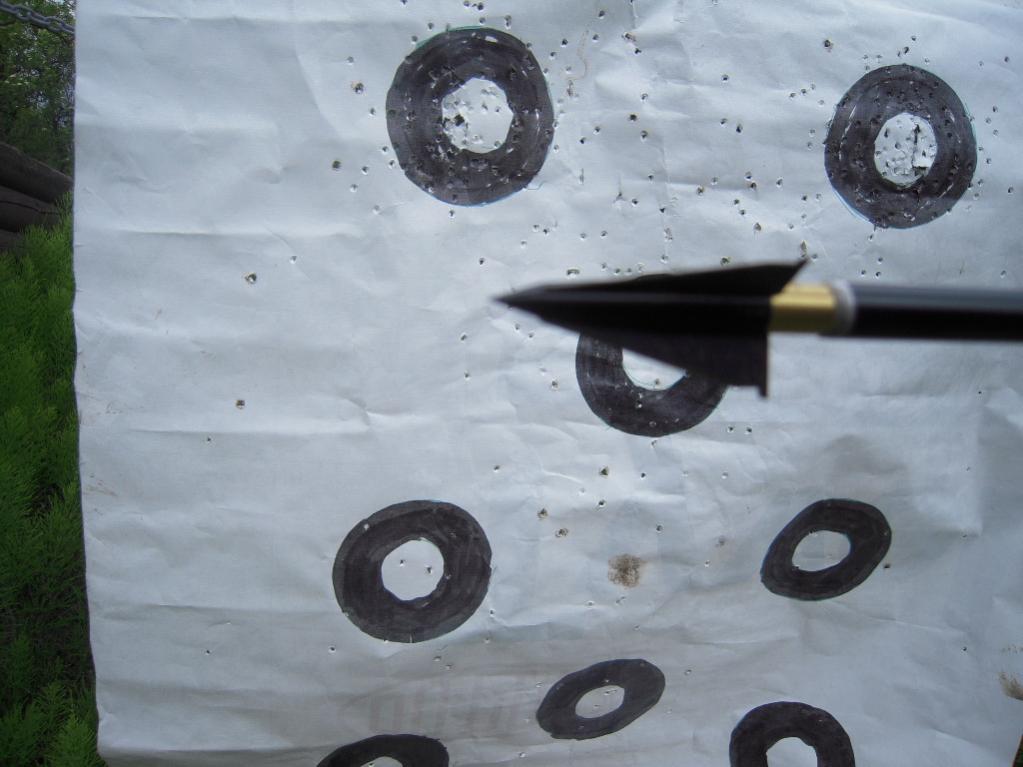
The two photos below show groupings with a 3 degree helical on Bohning 1.75 Vanes with skinny diameter Victory VAP arrows.


Bohning’s Vice President of Sales and Marketing, Dale Voice asked me what the results would be shooting a hunting arrow like the Victory HV 400 equipped with a Bohning Blazer with a 3 Degree Helical at 90 meters, a FITA distance!


Well as you can see the helical Blazer vane gave a nice arrow group with a 1st and 2nd rough sight dial in. One of our Burnaby Club members Phil, witnessed this first time 90 meter distance shoot and was amazed a large diameter hunting arrow equipped with helical Bohning Blazers displayed such a nice group at 90 meters. I can assure you my groups with straight vane Blazers at 90 meters would not be as tight a group.

Most FITA shooters use straight vanes or a small offset on their skinny arrows such as Easton X-10s and McKinney arrows, both which have small diameter arrow shaft, both which are not really suited to take such a radical 3 degree helical vane.

Shooting hunting arrows equipped with Bohning Blazers and a helical at 90 meters was under windy conditions during this field test. While the 90 meter arrow grouping was nice, wind definitely affected the arrow flight accuracy, but not arrow stability to group as it did. Still impressive!

Perhaps with further tuning, I could use these Helical applied Bohning Blazers in a FITA shoot just for the line cutting ability, though I surmise fellow FITA shooters may not like a Bohning Blazer equipped large diameter hunting arrow slamming into their pricey Easton X 10s or McKinneys.

Conclusion

All in all when points count, especially in 3D shoots, FITA (under 50 meters) and Bowhunting, you cannot beat a helical fletched Bohning vane, courtesy of Bohning Archery and their Bohning Helix Tower Jig.

For those who use 4-5 inch feathers exclusively, this Bohning Helix Tower Jig will not be able to handle your needs, though Bohning has a single jig for that purpose. 

For those who want to do 6 arrows at a time Jo Jo Jan multi jig and similar multi clamp style jigs will most likely serve you better.

Friday 30 September 2011

Double Take Archery Laser Bowplane 2


By Barry O’Regan – Bohning Staff Shooter, T.R.U. Ball Staff Shooter.

I had the opportunity to buy a used DoubleTakeArchery Bowplane Laser 2

Like many of us, trying to set your bow up after a new string or equipment install such as sights and rests usually results in making adjustments and dialing in you bow.

My forte is shooting and not spending time in trial and error bow tuning, unless completely necessary, say for a tournament.
Using the Double Take Archery Bowplane 2 laser, once installed, adjustments only take minutes.

A good idea with the DoubleTake Bowplane Laser is you can perform minor adjustments before you head out to the range.

Before the advent of laser tuning devices for bows, most of us would most likely spend an hour or two at the range watching your arrows hitting all over the target as you try an correct your sights (Left to Right) and your rests (left to right, up and down marks).

The Double Take Archery Bowplane Laser is placed like an arrow onto the bowstring and then it extends onto the rest. The laser automatically hits all the fixed points, such as your cam and bowstring. Once these points are established by the laser beam, adjustment of the sights and rest take minutes to accomplish.

One feature I like is the Bowplane laser will show if the alignment of your sight and rest is aligned directionally with your stabilizer. That is a plus for me when shooting FITA shoots.

Directionally meaning the laser line is straight alongside your stabilizer and not lining away from your stabilizer.


One downside to this Bowplane 2 Laser is the lack of an “on/off switch”.

Once you put the AAAA batteries (That’s right AAAA batteries, usually found in the Camera section of stores) and place the end cap back on, the laser instantly turns on, so care must be taken to turn the laser light away from you when installing the batteries, burnt retinas are no fun.

To turn off the Bowplane 2 laser you must remove the end cap and take out one battery, you can leave the other 3 batteries inside the Bowplane 2 laser.


WARNING

While the Bowplane 2 much like your arrow, broadheads and other archery accessories. The Bowplane is an awesome tuning aid, but best keep it locked up with your firearms and treat it as such. “IT IS NOT A TOY! KEEP AWAY FROM CHILDREN~”!

Below are photos of this awesome tuning product every archer should have in his archery kit.

Setting up your bow

Here is the Bowplane 2 Laser alignment setup for your bow.
This will at least allow you a more accurate setup and alignment before doing your minute adjustments at the range.

As you can see, the laser automatically shows the alignment of fixed points such as your cams and bowstrings, alignment then can be done to your rest and sight to ensure they align to the laser beam positioned over the correct sight and rest mark.

For finger shooters, the rest and sight locations will have to be adjusted just to the left about 1/4 inch or less of the laser beam for right handed shooters and to the right for left handed shooters.

One great aspect is once setup and alignment has been accomplished, any errant arrows if spined properly at the target may indicate your shooting form needs improving as the laser alignment, done correctly doesn't lie.

Bowplane 2 Laser

The Bowplane 2 Laser showing fixed string, peep and cam alignment

As you can see, the laser automatically shows the alignment of fixed points such as your cams and bowstrings, alignment then can be done to your rest and sight to ensure they align to the laser beam positioned over the correct sight and rest mark.

For finger shooters, the rest and sight locations will have to be adjusted just to the left about 1/4 inch or less of the laser beam for right handed shooters and to the right for left handed shooters.

Once you have a Bowplane Laser you will say "How could I have been without one"?

Below are photos of how to setup the Double Take Bowplane Laser:


Monday 26 September 2011

DIY Speed Nocks, pick up 6 fps and gain some sight placement yardage.

By Barry O'Regan  Bohning Pro Staff Field Reviewer, Bohning Staff Shooter, T.R.U. Staff Shooter.

Hello Everyone, I was curious about these speed nocks used on high performance bows for faster arrow speeds, while reducing string vibration.

Yesterday I took my 2008 Hoyt ProElite X2000, Cam 1/2 with a draw weight 56 # and 29.5 draw length as well as fletching some new Bohning Blazers on my 28.5 inch V6 Victory 400 Arrows to the range.

I also brought a dozen brass nocks (0.50 cents) usually used to hold your arrow in place on the string and keep the arrow from sliding up or down the string.

I also took my freshly calibrated Chronograph. I shot my bow and my arrow speed registered 275 feet per second (fps).

My experiment was to prove whether speed nocks are worth the effort in increasing arrow speed and reducing string vibration.

After some trial and error over 30 minutes placing a number of nocks starting right at the end of the serving below each cam, and shooting my arrows through my chronograph to record any speed increase and adjusting the nocks up and down the serving for the optimum sweet spot to gain as much speed as possible I gained close to 6 fps and quieted my bowstring oscillation in the process.

Conclusion

I am now shooting between 281.6 and 282 fps. To some that may not seem a big speed increase, but for me when shooting 3D I am usually within 8 points of a perfect score, and come either 3rd place, sometimes 2nd place and rarely 1st place.


So to me a 5 to 6 fps increase is huge, especially since I gain a few yards on each pin sight.

Certainly proof above I now have a faster arrow with a flatter shooting arrow which I hope will get me a few more points in a 3D tourney and put me in more 2nd place finishes with a few more 1st place spots.

Now I am in the process of changing my Cam 1/2 to a C2 cam on my ProElite and I am confident I will break the 290 fps barrier without increasing my bow weight from its current 56 pounds to 60 pounds.

Today I will back at the range with my FITA bow which is another 2008 ProElite, but was heavily customized and machined by Jim Posten, hence not a out of the box Hoyt.

One exception between my 3D Hoyt bow and my Fita Hoyt bow is my Fita Hoyt is a X3000 limb and is cranked up to 59 pounds and shoot 305 fps with 28 inch Victory Nanos, with Bohning fletches.

I figure with the addition of speed nocks I should pick up about 6 to 10 fps on my Fita bow.

I will let you know in a future post what those results bring.

So attached are the photos of the DIY of this process with proof in the pudding for those who want to take 30 minutes and get the same results as I have received.

No Chrono, no problem, fire a dozen arrows from different distances like 20,30,40,50 yards and mark their location with golf tees.

Once you put on the nocks in that sweet spot on the serving, fire another dozen arrows are the same distance like the first time, then compare your original arrows placement with your new and improve nockified arrow placement and you should notice your sight marking shows your arrow grouping a tad higher than they were before.


What to do to get an increase in arrow speed.

Here is the sequence I followed to get the additional arrow speed and flatter trajectory and silencing my bow string oscillation. These photos show my bow performance without putting nocks on the bowstring.


 Adding some Nocks to my Bowstring

Now the Chrono results by adding 4 brass nocks to the bowstring just below each Cam.


Sunday 25 September 2011

Arrow Spine Consistency, Tuning for Tighter Groups.

By Barry O'Regan - Bohning Pro Field Staff, Bohning Staff Shooter, T.R.U. Ball Staff Shooter.
 
Summary

There are three debates amongst archers on the spine stiffness area on an arrow.

The Question:

1) Is the stiffest part of the arrows spine under the manufacturer label?

2) Do all arrow manufacturers place the cock vane over the stiffest (spine) part ofthe arrow?

3) Can rotating the arrows nock assist in finding the stiffest part of the arrows spine?

Answer, No, No and Yes in that order!

The Test

This test will show you various arrows I will use and where the nock location will indicate on the arrow surface area which gives the best arrow groups out to 40 meters. This test will also indicate the most consistent spine stiffness from arrow to arrow manufacturer in which to affix your cock vane.

Don't Nock it, until you tried it!

All arrows will be using an adhesive Bohning Nock Position Indicator with gradient adjustments from 1 to 4 to show me the exact location of the nock in relation to the arrow in order to see where the consistency of the spine is finally located. By turning the nock a ¼ turn on each arrow should eventually see me getting a tight arrow group at 40 meters, thus concluding this is the best spine consistency from arrow to arrow!

Nocks such as Bohning Nocks have a raised line on the shank which I will correspond with the Bohning Nock Indicators Marked Gradients located on the end of the arrow.

The Bohning Nock raised line canthen be lined up with the Bohning Nock Indicator Gradients and used to consistentlyto determine where to affix your cock vane on the end of the arrow later onwith the help of marking the arrow shaft with a black sharpie.

The Arrows and Spine Range

I will shoot a set of four arrows with each set from different arrow manufacturers at 40 meters and adjust the nock a quarter turn at a time thereby rotating the arrow and shooting the arrow to see which nock location indicates the best group, thus indicate the most consistent spine from each arrow.

All arrows used in this test will be within the same spine (350-400) range for a 60 pound bow, though some arrows will be longer by a few inches and or heavier by up to 100 grains.

The test will use the most popular arrows such as the Easton Powerflight, Easton Fatboys, Gold Tip Hunters, PSEX-Weave, Bemans, Victory Arrows, as well as the Victory Nanos (Now calledVAPs).

All arrows will be tipped with Martin Archery 100 grain screw in field points.

Vanes and Feathers

The test will be based on the more popular used Vanes and Feathers such as Bohning Blazers, Bohning X Vanes, Duravane, AAE Vanes,TrueFlight and Gateway Feathers.

This way everyone's favorite vane or feather is included so compound and recurve bow, release and finger shooters can benefit.

Caveat

Keep in mind this test is not to determine the best arrow, vane, feather or point. This test is to find the most consistent part of the spine which will give the best arrow grouping.

Since these arrows are all of varying manufacturers, design, length and vanes, I will be using my 40 meter pin sight and not all arrows will be hitting the gold. For me to adjust my sight for each arrow set of varying size and weight arrows to hit the gold I would have to spend two days doing this test.

Again, we are going for best group, for accuracy into the gold I leave that up to you fellow archers to adjust your pin sights to do that!

(It is assumed all arrow manufacturers (with the exception of PSE's X-Weave carbon arrows) are consistent in their manufacturing process in placing the stiffest or consistent part of the spine in the same location for every arrow to date).

The Issue of Nock Tuning

The problem with nock tuning is vane clearance when you rotate the nock in which the vane may contact any rest that is not a full dropaway, hence the popularity of dropaways.

For this test, I replaced my Spott Hogg Infinity Blade Rest to a Dropaway rest which offers total vane clearance and no vane contact. This is especially critical when rotating nocks at varying degrees when trying to determine the stiffest part of the spine while getting no contact vane clearance. Once I get consistently tight groups, I strip off the vanes and put new vanes to correspond where the spine on the arrow is consistent. I then takeoff my Dropaway rest and put my Spot Hogg Infinity Blade Rest back on.

This test will allow archers whether they use a trigger release or fingers to fletch their vanes to their arrows and tune for best performance. If all things being equal this test should show the location where to place your cock vane over the stiffest or most consistent part of the arrows spine, without having to resort to changing their arrow rest like I have done to gain total vane clearance.

Spine Testers

Spine testers I have used in the past do not determine dynamic spine when an arrow is in flight, which will give me the best arrow grouping, only field testing will determine that. Spine testers are good for wood arrows and I will leave it at that!!

You should know carbon arrow spine can have various spine differences in a dozen arrows of the same set, even Easton X-10s may have one or two arrows in a set of a dozen arrows that are not matched. So there is nothing like true field conditions to see how arrows group at 40 meters when dealing with these carbon spine consistency anomalies. After all isn't great groups what it's all about, followed by sighting adjustments for great accuracy?

Once I attained the best arrow group possible using the Bohning Nock Position Locator, I let another archer shoot all the "newly tuned arrows" to determine if he would also get all arrows to group good and tight.

Below the accompanying photos will show the best grouping at 40 meters using various arrows.

The left photo will show the end result of the best arrow group.

The right photo will show the exact location where the stiffest part of the arrow spine is located and whereto affix your cock vane for best groups.

Easton Fatboy Arrows with TrueFlight Feathers (Parabolic)

Easton Powerflight Arrows with Bohning Blazer Vanes

Easton Powerflight Arrows with AAE Plastifletch Vanes

PSE X-Weaves Arrows with Gateway Feathers Shield Cut

Victory V Force HV Arrows with Bohning Blazer Vanes

Victory Nanos Arrows with Bohning X Vanes Shield Cut Vanes

Beman Arrows Made in France with Gateway Feathers Shield Cut

Gold Tip Arrows with TrueFlight Feathers Shield Cut

Conclusion

Once I adjusted the nock position using the Bohning Nock Position Indicator (Bohning Nock Indicator not yet for sale) on each and every arrow to attain the best arrow group, I photographed the results and posted the photos below.

While all big name arrow manufacturers produce great arrows to meet every archers budget,

PSE X-Weave arrows seem to standout unlike other carbon arrow manufacturers who have an overlapping seam along the length of their arrows. It is said this is the stiffest or most consistent arrow area on the carbon arrows spine.

PSE X-Weave are exactly what the name means,the carbon fibers use a weaving process whereby they are woven around the carbon arrow, hence no seam and it appears the X-Weave arrow groups at varying distances show no matter how you adjust your nock, the stiffness seems to be consistent all around the arrow and accurate.


Please refer to the field test photos below!


Please keep in mind, I am testing for grouping, not accuracy, as all arrows tested have different weight characteristics, thus dialing in for accuracy for each set of arrows for accuracy would take more time than I am willing to give for this test.

Easton Fatboy Arrows equipped with TrueFlight Parabolic Feathers.


Easton Powerflight Arrows with Bohning Yellow Blazer Vanes and AAE Plastifletch Purple Vanes


PSE X-Weaves Arrows with Gateway Feathers Shield Cut.

Actually in all fairness to PSE, it did not matter one iota which way I positioned the nock on the arrow, as grouping was consistently tight, scary tight slapping the arrows together hard.


Victory V Force HV Arrows with Bohning Blazer Vanes


Victory Nano Arrows with Bohning X Vanes Shield Cut Vanes


Beman Arrows (Made in France) with Gateway Feathers Shield Cut.


Gold Tip Arrows with True Flight Feathers Shield Cut